11.28.2013

THE BROAD BREASTED BRONZE // the local food report


Hi! I can't stay long this morning, and I'm sure you can't either. But in case you're standing around in the kitchen with your aunts and sisters and papas, I wanted to direct you to this week's Local Food Report. It's on the Broad Breasted Bronze turkey—an older modern breed that's got the big breast of a commercial turkey but the coloring of a wild turkey. It's a cool bird. And the farm manager I talk with—Stan Ingram of Coonamessett Farm in Falmouth—also talks about what free range means to the USDA (not much), what it means to him, and how free range meat needs to be cooked (a little differently). We also delve into modern turkey reproduction, which is anything but natural, and why dark meat might be a better choice than white. 

Happy Thanksgiving everyone!

11.25.2013

SPLIT PEA SOUP // liz

I know you're thinking turkey today. Also stuffing. Cranberry sauce. Mashed potatoes. Maybe Brussel sprouts and creamed onions. And pies! Apple-cranberry, pumpkin, pecan, and a real doozy called grasshopper (don't even ask; it's made with creme de menthe and not remotely local) are the staples on our Thanksgiving table. I'm thinking all those things too—which is why I decided to start the week by making split pea soup. I thought we'd work up to the excesses of Thursday with something a little more, well, spartan. Spartan but good.

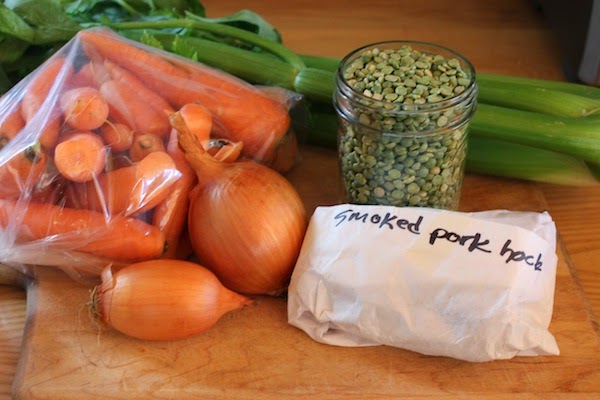
Nothing could be easier (or less expensive) to make than split pea soup. I like to make it with a smoked ham hock, assuming I can get one from a reliable source. We bought several for our freezer this year from Crystal Spring Farm, where we have a CSA, so I was all set in that department. The only other ingredients I needed were carrots, celery, and onions, all of which I bought at the farmers market on Saturday. And the peas, of course. Can you get locally grown split peas? Ask around. I was thrilled to find that Maine-grown split peas are available (here, for example).


While the wind howled and the temperature plummeted last night, I got out the big soup pot, chopped the veggies, and put the soup on the woodstove to cook. It was a bitter cold night, but with the soup simmering on the woodstove, we felt downright cozy. One of the great things about this soup is that it needs almost no attention; you just give it a stir every now and then while getting on with all the other things you have to do—which in our case was planning our Thanksgiving menu. By the time we went to bed, we had two-and-a-half quarts of delicious pea soup (and a killer menu). It should be just enough to feed Jan and me for lunch today through Wednesday. Then the cooking—and the eating, with family and friends—will begin in earnest. 

Happy Thanksgiving, everyone!


SPLIT PEA SOUP

This recipe is about as simple as it gets. It makes a fairly thin pea soup. If you like yours on the thicker side, add a few potatoes with the other vegetables. I happen to love carrots in my pea soup, as you'll see from the list below; you can always use fewer if you don't share my obsession.

2 cups split peas, either green or yellow
1 smoked ham hock
10 cups water
1–2 stalks celery, diced
5 large carrots, diced
2–3 medium-sized potatoes, diced (optional)
a few grinds of freshly cracked black pepper
1–2 tablespoons chicken bouillon; I like Better Than Bouillon Organic Chicken Base (optional)
sea salt, to taste

In a large soup pot, combine the split peas, ham hock, and water. Cover the pot and bring to a boil, then turn off the soup and let it sit for an hour. (This will help the peas soften.) At the end of the hour, turn up the heat again, to medium or slightly lower, and add the diced vegetables and black pepper. Simmer the soup, partly covered, for another hour or more, stirring occasionally, until the peas are completely soft—meaning you shouldn't be able to discern individual peas anymore. 

Now taste your soup and see what you think. If it seems a little bland, add the bouillon; although it's chicken, it's amazing how well it enhances the ham flavor. Remember that the bouillon has a fair amount of salt; if you use it, you probably won't need to add salt as well. Now remove your ham hock and let it cool. Remove the rind from the hock and carefully cut the meat off the bone. It won't be all that much, but it will add a lot of flavor. Mince the meat into small bits, being careful not to get any gristle or bone in it, and return it to the soup. Time to eat!

11.22.2013

THANKSGIVING MARKET // elspeth

Happy almost Thanksgiving!


In honor of the holiday, we're hosting a special off-season farmers' market tomorrow, Saturday the 23rd, in Wellfleet. It'll be at Preservation Hall, the usual spot, but inside instead of out because the backyard's freshly planted with grass and also, it's supposed to be chilly. Here's a list of what we'll have:

Arugula, radish greens, scallions, sweet potatoes, hot peppers, carrots, parsnips, Asian pears, regular pears, apples, pumpkin pies and pie kits, cranberry sauce, dry turkey rub, all kinds of tantalizing preserves, turnips, parsley, cilantro, holiday tea cakes, organic cranberries, cranberry shrub, cranberry ketchup, pumpkin seeds, coffee, hot cocoa, baby escarole, celery, winter squash, beets, The Beat Greens! and pasture-raised chickens from Truro. If you're having a small gathering, these could be your "turkey"! 

It's 10 to 1. I hope we'll see you there.

11.18.2013

SPICED PUMPKIN MUFFINS // liz

Yesterday was a perfect home day. We slept in (that means 7:00 for us), made omelettes with fresh red peppers and our own onions and kale, and lazed on the sofa with our coffee and the Sunday New York Times. When we finally decided it was high time we got dressed and did something, I helped Jan with some yard work, then went to work in the kitchen.

I made another batch of Carrot, Potato, & Turnip Soup, this time for the freezer—and using parsnips instead of turnips. While the soup simmered, I turned my attention to a quart of winter squash sitting in the fridge. I'd found it in the freezer a few days ago, labeled "Nov. '12," and had thawed it, knowing it should get used soon. Should I make soup? Nah. I've been making soup all week. Muffins? Perfect, and I knew just which ones, too. 


Sophie Minkoff's recipe for Spiced Pumpkin Bread won first place in New York City's 1985 Harvest Fair, but I prefer to make muffins with her recipe. They're so good! I love to make them with fresh pumpkin or winter squash purée, but I always freeze some purée too, so we can enjoy these muffins any time of year. If you have an excess of winter squash in the fall, as we usually do, cook it and stash it in the freezer; you'll be glad all year to have it.


By the time Jan came in from stacking the last of our winter's wood, the soup was ready and the muffins were just coming out of the oven. It was time for lunch, a cup of tea and a warm muffin, and then a lazy afternoon.

SPICED PUMPKIN MUFFINS

This recipe is slightly modified from one in the New York Cookbook by Molly O'Neill. Elspeth posted the original recipe—which is for a bread, not muffins—back in 2010, but I've tweaked it a bit since then. I like to use at least half whole-wheat flour, and I think the recipe could probably use even more than that. I've also increased the amount of nuts and cinnamon. The recipe below makes 12 standard-size muffins.

1 cup raisins
2 large eggs
1/2 cup vegetable oil (I like to use a mild olive oil)
1 cup pumpkin or winter squash purée (unsweetened)
1 cup whole wheat flour
1 cup all-purpose flour
3/4 cup sugar
1 teaspoon baking soda
1/2 teaspoon salt
1 teaspoon cinnamon
1/2 teaspoon nutmeg
1 cup coarsely chopped walnuts

Preheat the oven to 350 degrees F. Grease a muffin tin or line it with muffin cups. (I like the foil ones better than paper.)

Combine the raisins and 1/3 cup water in a small saucepan and bring to a boil. Remove from heat and set aside to cool.

In a mixing bowl, whisk together the eggs, oil, and 1/4 cup water. Add the pumpkin purée and stir well.

In another mixing bowl, whisk together the flours, sugar, baking soda, salt, cinnamon, and nutmeg. Add the pumpkin mixture and stir until just combined. Stir in the un-drained raisins and the nuts.

Dollop the batter into the muffin tin and bake for 15 to 20 minutes, or until a broom straw inserted in the center of a muffin comes out clean. 

11.14.2013

GRASS-FED BEEF // the local food report

What's so good about this steak?


For starters, I finally learned how to cook it. I've nailed it now twice in one week. Bring on the meat! But there's another, more important component at play. This steak is 100 percent grass-fed, from a local cow. What does this mean?

Well, there's a lot of meat jargon out there these days. Grain-finished. Grass-finished. Grass-fed. Pastured. Hormone free. Antibiotic free! Depending on who you ask about what all these terms mean, you can get different answers.

Let's start with the current conventional standard of cattle farming. While there is some middle ground, there are two basic ways to do it. You can raise calves on mother's milk and pasture, and continue them on pasture for another few years until they reach slaughter size. Or you can start by raising calves on mother's milk and pasture, and once they reach a certain cut-off weight—usually around 650 or 700 pounds—put them on a diet where 70-90 percent of their rations come from "grain and protein concentrates," usually some combination of corn and soy byproducts. On this grain-based diet they reach slaughter size much faster than they do on grass, and they get much fatter.  In fact, most feedlot cattle are 30 percent fat by weight—technically obese. Because they gain weight so quickly, they gain a lot of it as intramuscular fat, what butchers and cooks call "marbling." Grass-fed animals, in contrast, tend to gain fat around their bones.

There is something we should stop to note. The USDA grades beef based on the amount of marbling and a cow's age at slaughter. The younger and fatter, the better the grade. Since grass-fed cattle have on average half as much fat as grain-fed cattle and often take a year or two longer to reach slaughter size, they don't usually make the cut.


Before we get into the health implications of all this, let's start with the history. Grain-finishing—finishing is the term used to describe the process of fattening cattle up for slaughter—is a relatively new phenomenon. Until about the 1950s, most cattle were raised and finished on grass. But with the advent of the Green Revolution, U.S. farmers found themselves with a lot of cheap corn and soybeans on hand. They started feeding them to cattle, noticed how quickly the grains fattened the cows up, and decided it was quicker and cheaper to finish cattle on grain. 

But there were health consequences. Lots of them, both for the cows and for us. 

For starters, ruminants aren't good at digesting grain. Grain-based diets lower the pH in their colons, fostering the growth of a new acid-resistant strain of E. coli (O157). Other strains of E. coli live in the colons of healthy cows and humans, and can be harmless. And usually, even if we eat food contaminated with E. coli (usually by way of fecal matter), our stomach acid kills it. But this acid-resistant strain of E. coli is much more dangerous—it thrives in our acidic stomachs.

In addition to increasing our risk for E. coli, feeding cows grain also changes the composition of their fats. The typical American consumes 14-25 times more omega-6 fatty acids than omega-3 fatty acids, mainly because we eat so many processed foods. The ideal ratio is 1:1, and we can't make these fats—we have to eat them. This imbalance has been linked to heart disease, diabetes, depression, obesity, cancer, arthritis, asthma, and a host of other health problems. Grass-fed beef has a much more favorable ratio of omega-3 to omega-6 fatty acids than grain-fed beef, and also has twice as much CLA, or conjugated linoleic acid. CLA is a rare omega-6 fatty acid that acts more like an omega-3 fatty acid, in that it's thought to reduce the risk of heart disease, keep cholesterol and weight in check, and boost the immune system.

Finally, grass-fed beef has been found to have ten times as much beta-carotene as meat from feedlot cattle (that's why the fat from grass-fed beef has a more yellow color than the snow-white stuff you see on grain-fed steaks) and at least three times as much Vitamin E. And that's just the nutrition stuff. 


Feedlot diets also make cattle sick. Crowded together with their digestive systems doing overtime (they're asked to gain between 2 and a half to four pounds a day), they're at a much higher risk than animals on pasture for all kinds of diseases. To counter this, many farmers add antibiotics to the animals' daily rations, both as a way of keeping disease in check, and because they've noticed that antibiotics, too help cattle gain weight. The use of antibiotics in farm animals has increased over ten to twenty times since the 1950s, and the antibiotic-resistant pathogens that develop in these animals can make us sick, too, and leave us with no way to treat the illness. 

In addition to antibiotics, most feedlot cattle are also often given growth hormones in the form of implants. Nearly all cattle entering conventional beef feedlots are given a combination of six anabolic steroids, including estrogens, testosterones, and progesterones. Measurable levels of all of these growth hormones—including those that mimic human sex hormones and are known endocrine disruptors—are found in the meat at slaughter, which means we're eating them. There has been remarkably little research done in the United States on the effects of these hormones (the E.U. banned them in 1988). But a 2007 study looked at sperm quantity and quality of men born to women who ate a lot of beef (defined as more than seven servings per week, which really is A LOT!) or "not much" beef (less than seven beef meals per week, still a fair amount). The more beef women ate, the lower their son's sperm concentrations. Most beef in the United States comes from grain-fed, feedlot cattle, and hormonally speaking, this study is just the tip of the iceberg. Premature puberty in girls, various reproductive cancers, and a host of other health issues have also been linked to endocrine disruptors. Is it all because of grain-fed steak? Not at all. But sticking to grass-fed meat is one thing that can help.

So this all is the long answer to the question: What's so good about that steak?

The short answer is this: Compared to a conventional, grain-finished steak from a feedlot, it has on average twice as many omega-3 fatty acids, twice as much CLA, ten times as much beta-carotene, three times as much Vitamin E, and none of the antibiotics or growth hormones.

It also costs twenty to forty percent more. You get what you pay for. To me, it's worth every penny. 

11.13.2013

ROASTED TOMATO & LENTIL SALAD // elspeth


So. Where were we?

Right. Yotam Ottolenghi. This time let's talk lentils. Puy lentils. Have you had those? They're really good. They don't fall apart like red and yellow lentils. They've got staying power. They're a little bit hard, but not too hard—you have to harness them just right. 

I keep some in a jar on the kitchen counter. There are some things I like to have on hand when the moment strikes: Blue cheese. Red onions. And good red vinegar. Puy lentils, oats, brown rice. You know the types.

At any rate, this dish is full of those. It takes the last roasted cherry tomatoes from the garden (and there were still tomatoes at the farmers' market this week! in Orleans!) and tosses them with parsley, chives, and dill, red onions softened in good red wine vinegar, and a pot of puy lentils. It is excellent alongside a piece of fish. Or with bread. Or topped with a fried egg for lunch. Really, however you want to spin it.


PUY LENTILS WITH ROASTED TOMATOES & BLUE CHEESE

This recipe is adapted slightly from Plenty by Yotam Ottolenghi. If you can't find any fresh tomatoes, you could sub sun-dried tomatoes or pieces of roasted winter squash. What you want is a hit of sweetness with a lot of flavor. For the blue cheese, I like to use Great Hill Blue, made in Marion, MA.

for the tomatoes:
1 pint cherry tomatoes, halved
1 tablespoon fresh thyme
sea salt
2 tablespoons olive oil
2 tablespoons balsamic vinegar

for the lentils:
1/2 red onion, very thinly sliced
1 tablespoon red wine vinegar
1 teaspoon sea salt
1 and 1/3 cup Puy lentils
3 tablespoons olive oil
1 garlic clove, minced
black pepper
1/4 cup chopped parsley
1/4 cup chopped chives
1/4 cup chopped dill
3 ounces Great Hill blue cheese

Preheat the oven to 200 degrees F. Arrange the tomatoes cut side up on a rimmed baking sheet, sprinkle with thyme and sea salt, and drizzle with olive oil and balsamic. Bake for 60-90 minutes, until the tomatoes shrivel up and start to lose some moisture.

Meanwhile, soak the red onion in the red wine vinegar and a pinch of salt for 10 minutes. Place the lentils in a pot and add water until they are covered by 1-inch of liquid. Bring to a boil, the cook for roughly 30 minutes, until tender. Drain the water and immediately toss with the onion and vinegar. Add the olive oil, garlic, and some black pepper. Set aside to cool to room temperature.

Right before you're ready to eat, add the herbs and roasted tomatoes and toss well. Add sea salt to taste. Transfer to a serving dish and top with crumbled blue cheese. 

11.07.2013

HIGHLAND CATTLE // the local food report

Photo Credit Seawind Meadows

Let's be honest. I am not the meat cooker in the family. No. I do not grill. I rarely sear. I sometimes sauté ground beef. And about twice a year, I cook a slow roast. For some reason that I think involves screwing up an otherwise expensive and amazing dinner, I am terrified of pulling any cut out of the freezer that involves the word "sear." 

I know you're supposed to rely on your hand. My friend Kevin showed me once how you press on your palm and it tells you when your steak is done. Thumb and index finger touching, feel your palm. If the steak feels this way, it's rare! Pinky to thumb? Well done! I totally get it. And I am totally still scared.

I set out today to conquer that fear. I spent a long time talking with a cattle farmer from Dennis the other day, Laura McDowell-May of Seawind Meadows Farm. We talked a lot about the breed—Highland cattle, originally from Scotland—and also about how she likes to eat their meat. She talked about rib-eye. She reminded me just how wonderful a steak can be. 

When I got home I pulled a rib steak out of the freezer from an animal we split with friends last year and started reading up. The book I like is called The Grassfed Gourmet Cookbook by Shannon Hayes. It has all kinds of recipes specifically for pasture-raised meats, which in general tend to be leaner than conventionally-raised meats. They often require lower heats and longer cooking times. 

Her instructions for the steak were spot on. Mine wasn't quite as thick as she requested, so I lowered the cooking times. But I wanted it rare, and when my thumb and index finger touched, it felt just right. So I turned off the heat, let it rest, and added a pat of butter on top. It was sublime.

GRILLED RIB STEAK

This is about as simple as it gets. Shannon's original recipe uses the grill, but given the weather recently, I adapted it to the stove. Besides regular rib steaks, other cuts that would work include T-bone, porterhouse, New York strip, top blade, or rib eye. Please note that the cooking times and temps are meant for meat from a grass fed and grass finished animal. 

2 rib steaks roughly 1-1 and 1/2 inches thick 
coarse sea salt and freshly cracked pepper
1 tablespoon butter

Sprinkle the steaks liberally with sea salt and pepper. Bring them up to room temperature—this takes 30 minutes to an hour, depending on the time of year and temperature of your house. When they're ready, warm up a cast iron skillet on very high heat.

Grease the pan with the 1 tablespoon butter. Lay the steaks in the hot pan and sear until well-browned, about 2-3 minutes depending on the thickness of your meat. Flip the steaks, sear another minute, and turn off the heat. The residual heat from the pan will finish the job. If you want to check the temperature you can stick a meat thermometer into the side of the steak, but don't jab it into the top. Rare is 120 degrees F, medium is 135. I really wouldn't go past that. Let the steaks rest for 5-10 minutes before serving. A pat of butter on top doesn't hurt.

11.05.2013

SWISS CHARD WITH TAHINI SAUCE // elspeth

I don't know where to start except to say that Yotam Ottolenghi is magical. Last February I had never heard of the guy. I now consult his cookbooks before doing my grocery shopping. 


First there were the meatballs with shallots and figs and the arugula, artichoke & herb salad, then that flakey muttabaq and the fish cakes in tomato sauce, all in the span of a single week! In April Anna busted out the black pepper shrimp, and May brought his spanikopita-style herb pie. In June we apparently forgot what was good for us, but we made up for it in July with that pesto potato salad. And oh dear lord in September the fresh corn polenta with the eggplant sauce! There should be hymns about these cookbooks, this man. He is a genius.

This week we've been on another bender. Friday we made puy lentils with roasted tomatoes and gorgonzola. Sunday I consumed an entire pound of Lucas's Swiss chard sautéed with wine and garlic and topped with toasted pine nuts a garlic-lemon-tahini yogurt sauce. A few minutes ago we polished off the last of the season's eggplants roasted and stuffed with lamb and pine nuts. I'll start with the Swiss chard. 


SWISS CHARD WITH YOGURT-TAHINI SAUCE

Generally speaking, Swiss chard is not my favorite green. I'll take arugula or kale over it any day. But wilted down, garlic-ed up, and sauced, Swiss chard becomes divine. Tahini, yogurt, and pine nuts can do that to things. This recipe is adapted slightly from Jerusalem by Yotam Ottolenghi and Sami Tamimi. It serves 4.

3 and 1/2 tablespoons tahini
4 and 1/2 tablespoons plain Greek yogurt
juice of 1 lemon
2 tablespoons water
3 large garlic cloves, minced
1 large bunch Swiss chard
2 tablespoons butter
2 tablespoons olive oil
1/4 cup pine nuts
1/4 cup white wine
sea salt and pepper to taste

First make the sauce. Whisk together the tahini, yogurt, lemon juice, water, and 1 clove minced garlic and set aside. 

Get out a big soup pot. Fill it about 2/3 full with water, salt it, and bring it to a boil. Chop the chard, separating the stalks from the leaves. Cut the stems into 1/4 inch pieces and add them to the boiling water. Simmer for 2 minutes, then add the chopped leaves. Simmer another minute, drain, and run cold water over the chard. Squeeze out any extra water.

In a large frying pan, warm up the oil and butter over medium heat. Add the pine nuts and toast until they're golden. Use a slotted spoon to remove them and set aside. Add the garlic to the remaining oil and butter in the pan, cook for about a minute, then add the wine. Let the liquid reduce by half, then add the chard and stir until warm. Season with sea salt and pepper to taste. Serve hot, topped with a dollop of the yogurt-tahini sauce and toasted pine nuts. 

11.04.2013

CARROT, POTATO, & TURNIP SOUP // liz

We're home from Monhegan, invigorated by a week spent largely outdoors—hiking through woods and over rocky ledges, birdwatching, and enjoying every minute of what island residents refer to as their "simple, friendly way of life." Sally had a blast. She hiked and birded with us, fed the ducks at the Ice Pond, played hide-and-seek in the spruce woods, explored the old tugboat wreck at Lobster Cove, played in an old skiff, made friends with the island dogs, and tried in vain to pat a hen. 


At day's end, while Sally played in front of the warm fireplace, we grown-ups set our minds to cooking. As you might imagine, when you get Elspeth and Alex together in the kitchen, good things happen. We ate like royalty all week. We also tried out several new recipes. Jan and I had gotten our last CSA pick-up of the season just before our trip, so we brought a cooler full of root vegetables with us. The recipe below did a fine job of using them up.  It made a lovely first course for dinner one night—along with oysters and Alex's variation on a Manhattan that he called a "Manhegan"—and a delicious lunch the next day.


The original recipe called for puréeing the soup in a blender or with a Foley food mill or immersion blender. We didn't have any such tool on the island, so we skipped this step—and decided that was probably a good idea. Our bowlfuls of diced vegetables shimmering in broth were as beautiful as they were tasty.


CARROT, POTATO, & TURNIP SOUP

Elspeth created this recipe from a similar one that appeared in an old issue of Cooking Light magazine. There's ample room for experimentation here. For example, you could use celeriac instead of celery; use parsnips instead of—or in addition to—turnips; or for a thicker soup, add a bit of cream. The amount below serves about six, and if you have leftovers, it freezes well.

2 tablespoons butter
2 tablespoons olive oil
4 large leeks, cleaned and thinly sliced
2 1/2 cups sliced carrots
2 cups cubed potatoes (red potatoes are especially nice)
2 cups peeled and cubed turnips
3/4 cups chopped celery
6 cups chicken stock
1 tablespoon finely chopped fresh sage or 1 teaspoon dried sage

Melt butter and olive oil in a large soup pot and sauté the leeks over low heat for about 15 minutes, until they're nice and soft. Add all the chopped vegetables, stir well, and continue to sauté everything over low heat for another 15 minutes. Add the chicken stock. (I often use Better Than Bouillon's Organic Chicken Base.) Bring to a boil, then turn down the heat and simmer until all the vegetables are tender, about 20–30 minutes. If you want your soup puréed, let it cool a bit and then purée it. Stir in the sage, and enjoy.


LinkWithin

Related Posts Plugin for WordPress, Blogger...
All text, photographs, and other original material copyright 2008-2010 by Elspeth Hay unless otherwise noted.