Showing posts with label MEAT. Show all posts

3.28.2011

Speaking of great

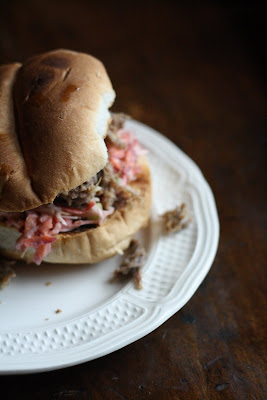
If I could change geography, I would. No offense to Kennebunkport and Kittery and southern New Hampshire and the whole south shore, but I would squish them inland, or maybe shift them south. Then, I'd build a short bridge—I'm thinking five miles or so—from our house in Wellfleet to my sister's doorstep in Portland, Maine. My parents would only be a half hour's drive north, and we could all get together and cook and eat and sit around on Sundays. It would be just like last Sunday, when my sister and I both made pulled pork, except we could make it in the same pot, do half the dishes, and have twice the fun. It would be great.


Speaking of great, I should say a few things about the pulled pork. First off, I'd like to thank Martha—you know, the Martha—for making it all so easy. I have to admit that before I found her recipe I was sort of intimated by pulled pork, and when you routinely have half a pig in your freezer, that is not a good way to be. I was under the impression that you needed a crock pot, or possibly even a fire pit, but Martha straightened me out. She showed me that you can make excellent pulled pork with very few ingredients in your very own oven in less than three hours, and that it will be so good that even your husband will declare it "North Carolina Tasty."

It's easy. All you need is some pork shoulder (also known as pork butt)—we used two pork butt steaks with the bones still in—a bit of brown sugar, some cayenne pepper, minced garlic, and a few cups of apple cider vinegar. Seriously, that's it. Oh, and an oven. I also added homemade coleslaw and some Portuguese rolls, but that was for sandwiches. All in all, it made for an excellent experience.

Now we'll just have to wait for the next pig, and a new shoulder to experiment with. And maybe, just maybe, one day we'll build that bridge.

PULLED PORK

This is an excellent way to use pork shoulder—whether you have it as one big hunk or it's divided into steaks. Martha calls for boneless shoulder, but I don't think it really matters. We left the bones in and ours came out excellent.

When it comes time to toss the cooked meat with the pan juices, don't be afraid of adding the fat back in—if the meat is from a pastured animal, this is where you'll not only get your flavor but also a lot of top notch nutrients.

1/4 cup packed brown sugar
1/2 teaspoon cayenne pepper
1 tablespoon sea salt
1 teaspoon ground pepper
3 pounds pork shoulder, cut into four pieces
1 and 1/2 cups cider vinegar, plus extra for serving
4 garlic cloves, minced
1/2 cup water

for sandwiches: add 8 sandwich rolls & homemade coleslaw (I like shredded cabbage and grated carrots with roughly this dressing)

Preheat the oven to 350 degrees F. In a small bowl, whisk together the sugar, cayenne pepper, salt, and pepper.

Place the meat in a large, heavy-bottomed pot and rub it with the spice mixture.

In a medium bowl, whisk together the vinegar, garlic, and water and pour this mixture over the pork. Cover the pot, put it in the oven, and bake for about 2 and 1/2 hours, or until the meat is very tender and separates easily when pulled with a fork.

Transfer the pork to a cutting board, saving the juice in the pan. Use two forks to shred the meat, put the meat in a large bowl, and toss it with the reserved juice. (You may not need all of it; we used about two thirds). At this point, if you like your pork a little tangier, add a few extra tablespoons cider vinegar.

If you're making sandwiches, pile the rolls with equal portions pork and coleslaw, and serve at once.

3.08.2010

The picnic

This might not be what everyone thinks of when they hear the word picnic, but based on my experience last night, it should be.

The picnic up there is a pork picnic—the cut of meat just below the Boston Butt, on the low, strong part of the animal's front leg and chest. It is sometimes also called a shoulder, but so is the top chest cut, so I like to stick with picnic for clarity's sake. The picnic is a big cut of meat—about seven or eight pounds usually, with the bone still in. It tends to be fatty (and sometimes still with skin) on the underside, but up top, it's all meat. Most of the time, it ends up getting smoked and sold as a ham. But if you are lucky enough to get a fresh picnic, well, then it's slow-roasted jerk time.

Yesterday was the perfect day for a picnic. It was that first warm, sunny day, the first time you dare to throw open the windows and the doors and let the fire go out. Also, it was the first time it was warm enough to make mint juleps in my grandmother's hand-me-down silver julep cups. (Thank you Biee! We love them!) Since we were headed south with our drink recipe, it was only a small leap from Kentucky bourbon to pulled pork cooked in a Jamaican jerk paste.

We had real jerk in Jamaica in January when we went to a friend's wedding, and I have to say, this recipe isn't that. But it is delicious in its own right—in a spicy meets simple sort of way. It dances on your tongue the way we rocked and swayed to the reggae crooner on the lawn after their ceremony, and it is every bit as memorable. We ate it last night straight off the bone, and today pulled apart and stuffed into sandwiches made on a biscuity Irish soda bread spread with a gravy Alex cooked down from the extra fat and black beans cooked in the leftover jerk juice.


It wasn't the kind of spring picnic I usually take, but then again, yesterday wasn't your usual March day.

SLOW-ROASTED JAMAICAN JERK PICNIC

I had a very hard time deciding what to call this dish. It isn't really jerk, and it isn't really pulled pork—you can eat it first sliced, then pulled. But I realized the name doesn't really matter. What matters is simply that you buy the best meat you can—and that you don't skimp on the quality of the hot sauce. Otherwise, the only thing you'll have to do is set aside a warm spring afternoon, and enjoy.

juice of 3 limes
juice of 1 lemon
juice of 1/2 orange
1/4-cup habanero-based hot sauce
1/2 cup white vinegar
6 scallions, coarsely chopped
2 tablespoons dried basil
2 tablespoons dried thyme
1 tablespoon dry mustard
1 teaspoon ground cloves
1 teaspoon salt
1 teaspoon ground black pepper
1 medium pork picnic, roughly 7-8 pounds with the bone in
2 cups ham stock
2 cups water

Whisk together all the ingredients but the pork, the stock, and the water in a small bowl. Get out the picnic and trim any excess fat, and if there is any, skin. (Some cooks like to leave the fat and skin on to seal the juices in, so if you prefer to do things this way, go ahead. It will simply mean you have to do a little more trim work on the serving end. Either way, don't waste the fat—melted down and whisked together with a bit of flour and stock, it makes a superb gravy.) Place the picnic in a large, heavy-bottomed pot, and pour the jerk paste in. Rub the paste all over the meat, and put the pot in the refrigerator for several hours, or up to overnight, to allow the picnic to marinate.

About four hours before you'd like to eat, take the pot out of the fridge. Remove the meat from the pot and set it aside. Add the ham stock and water to the jerk paste and bring them to a boil. Add the meat, turning it several times to make sure it is moist and still coated in seasonings, and turn the heat down as low as it goes. Cover the pot and leave the meat to simmer. Turn the meat every hour or so until the internal temperature reaches at least 160 degrees. If you prefer your meat a little bit more well done, go up to 170 or so. Turn the heat off and leave the meat to rest for a half hour.

Carving the meat is easy—it should be falling gently off the bone. Serve it warm, with plenty of the meat's cooking juices and something cooling like coleslaw or potato salad and maybe a mint julep or two. And if you have leftovers, be sure to make a pulled pork sandwich. Or a few.


1.07.2010

The Local Food Report: a Perry Special

I'm sorry if I sounded a little out of sorts the other day. I didn't mean to, but I have a feeling that I might have, and so today I decided to bring you flowers. Tulips, to be specific, a little bit wilted, but from what I've heard it's the thought that counts.

It's just that sometimes, when I spend a little too much time listening to Living on Earth and Science Friday and reading books like Collapse, I get overwhelmed. I wonder what on earth we're supposed to do to get out of the mess we've gotten in, and even if we could figure it out, how we would convince everyone, all at once, to get on board with a colossal community solve. Luckily, this time, just before things got too deep, I ran into my friend Drew. Drew is one of those people who makes you feel like the world is definitely, without a doubt, going to be fine. Not even just fine, but really good, like in an all around a-okay rose bushes and tinted glasses sort of way.

Drew is twenty-one, and he grew up on his family's farm near Corn Hill Beach in Truro. His last name is Locke, but going back his grandfather's name is Perry, and the Perry farm, or Hillside Farms, is usually how people in Truro know the place. The Perrys are the ones that sell homegrown cucumbers and tomatoes and watermelons at their stand on Route 6 in the summertime, and a long time back, they had chicken and eggs and beef, too.

Drew's in school right now—at the Stockbridge Ag program up at UMass Amherst—the program that started the school, and the one his grandfather went to, too. He's all excited about things like pigs raised on restaurant scraps and the Buy Fresh Buy Local movement and Joel Salatin's systems for growing healthy chickens, the so-called "salad bar."

Back when his grandfather ran the farm, in the 50s and 60s, the land supported over 10,000 birds. Half were layers, half were broilers, and they all lived in a big, three story barn. In the winter, when the birds laid too many eggs to sell, Mr. Perry trucked the extras up to Boston. And in the summer, when all the visitors came down, he ran a delivery service around town. Eventually, though, government restrictions got tighter, and the number of birds he was allowed to have shrank down into the hundreds.

Then, in the 80s, there was an event known as the Perry Barbecue. I will spare you the gorey details, but suffice it to say that it involved a storm, and the chickens, and some lightening, and that it was not a very pretty sight. The Box Lunch even named a sandwich after the debacle—the Perry Special, with chicken and bbq sauce—which you can still order to this day. After that, the chicken operation went belly up.

Drew's goal for this summer is to bring at least a few hundred of those chickens back.

He's thought about it a lot. He's done a lot of number scratching and note taking and idea bouncing and regulation studying, and he thinks, he's pretty sure, it can be done. His grandfather is a little bit skeptical—Don't put $4 into a beet you can only sell for $2, he says—and Drew knows it's good advice. Only with a pasture-based system—one that relies on grass instead of purchased feed—he thinks he can make things work. He won't have to rebuild the huge old barn, either, because he plans to graze the chickens rotationally, moving them around the grass in bottomless cages to a new 12' by 12' plot every day. When slaughter time comes, he can hook into the state's new Mobile Poultry Processing Unit, the MPP pilot program, and save himself $30,000 on a slaughterhouse. Then on the business side of things, he'll replicate his grandfather's model—tapping into the market through the farm stand and deliveries. When he talks about it, he breaks into a huge, contagious grin. It's pretty great.

The part that gives me the most hope, though, is the way what Drew's been learning at Stockbridge has shaped what he wants to do. It's easy to wonder, sometimes, just how much of an effect writing something down during a lecture can have—whether or not anyone is really going to do anything with what's on that piece of paper or not. But I think, when I look at what kids I went to college with are doing, people who only graduated three years ago, and what Drew plans to do before he even finishes up, that knowledge is actually shaping our generations' dreams and jobs quite a bit. And that of course, in turn, is shaping what ends up in our kitchens, and on our dinner plates.

With any luck, before long, it will be one of Drew's organic, pastured, Truro-grown and Truro-processed chickens we're cooking up. I can hardly wait.

OVEN FRIED CHICKEN

My mother used to make this chicken, and my sister and I liked it so much we called it The Chicken. What you'll find below isn't so much of a recipe as an off-the-cuff outline, but the good news is you really can't go wrong. The dish comes from my grandmother, who says she has absolutely no idea when she started making it, or why, except that oven fried chicken was all the rage at one point. She says she used to make it in Youngstown, Ohio, when my mother was little, and when I tried to ask her about the details, she said that it's so simple that there really aren't any.

She can see herself making it in their old Youngstown kitchen, she said, turning on the oven and melting the butter in a big Pryrex casserole dish, putting a little bit of flour in a bag with some salt and pepper, and then shaking a few chicken thighs and drumsticks around until everything was properly coated. Then, according to the recipe she wrote out for my mother, she would drop the chicken in the butter, put the whole mess in the oven, and cook the chicken pieces for about a half hour on each side. My mother must have added the herbs at some point, and I have a sneaky feeling she changed the flour to whole-wheat, too. Don't be afraid to do your own improvising, and be sure to let us know how it goes.

4-6 tablespoons butter
1/2 cup whole-wheat flour
1/2 teaspoon dried basil
1/2 teaspoon dried tarragon
1/2 teaspoon dried sage
1/2 teaspoon dried marjoram
salt and pepper to taste
1 pound assorted chicken cuts—a mixture of thighs, wings, and drumsticks works well, because they cook more evenly when they're the same size, and also, thighs tend to be pretty cheap

Preheat the oven to 400 degrees F. Put the butter in a 9" by 13" casserole dish, and stick it into the warming oven until it melts. Combine the flour, herbs, and salt and pepper in a quart-sized plastic bag and mix well. Add the chicken and shake until every piece is well coated with the flour mixture. Arrange the chicken pieces in the casserole dish in the melted butter so that none of the pieces are resting on top of each other. Bake for 25-30 minutes, turn the chicken pieces over, and bake them for another 25-30 minutes, or until crispy and golden, on the other side. Enjoy hot, maybe with a salad or biscuits if you are feeling especially indulgent.

P.S. Up-Cape, there are already a few places to buy locally raised birds. There's Ocean Song Farm in Cummaquid, and also Miss Scarlett's Blue Ribbon Farm in Yarmouth Port (508.420.9748). Just over the bridge, I've gotten very good chicken from Paskamansett Farms in Dartmouth.
12.07.2009

Down to earth

Sadly, I think I have come back down to earth. Not that where I've landed is such a bad place, because it's pretty wonderful actually, but you know, it's just a little bit more real down here. As in, deadlines and thirty-six-degree rain and our-dog-ate-your-cake real.

No really, he did.

He has sort of a track record with this kind of behavior, but yesterday's episode was particularly un-amusing, because it was the end of a two day streak which involved, amongst other crimes, fishing the pork butt bones from the trash, demolishing them, giving them back to us in a most unsavory form on our bedroom floor, and finally, stealing my still-hot buttermilk cake, every crumb. Luckily, I hadn't put the lemon-thyme infused pears on top, or he would probably be at the pound right now. At any rate, he wanted me to tell you that he is very sorry about your cake, as am I, and that we promise to make it for you again soon, before all the pears disappear. In the meantime, you will have to settle for pâté de campagne, which, who are we kidding, is not really settling at all.

Pâté de campagne, in case you've never tried it, is one of the very best specialties of the French. It is a country pâté, made from ground pork butt and pork liver and onions and garlic and parsley and spices bound together with a panade and baked in a water bath in a terrine mold. It is a lot more rustic than some of its more famous pâté counterparts, like foie gras or liverwurst, which are smooth and spreadable and a lot more like butter than meat. Instead, pâté de campagne is smooth on the outside but rough hewn in the middle, sort of like a very dense, extra moist meatloaf that you cut into slices and devour on toasted baguette. We had it in Paris, several times, and this weekend, we made it again at home.

As you can see up there, we actually tried to recreate everything from Paris this weekend at home—the baguette with butter and radishes, the spicy arugula bedding, the side of sauteed mushrooms with toast, too. Our three days in Paris, if we're being entirely honest, consisted mostly of eating and walking and stopping to eat again, and we haven't really seen any particular reason to stop just because we're back home.

We have some challenges ahead of us for sure, like recreating the Dover sole with champagne butter and the gnocchi with escargot we had at Au Bon Accueil, a fancy restaurant near the Eiffel Tower where my mom's friend from college sent us, and that Alex claims changed his life. We have our work cut out with the chocolat chaud, too, and the way it's so thick it almost feels like warm chocolate pudding in your mouth. The soupe à l'oignon will be difficult, and I have not met anyone around here just yet baking Paris-status croissants, but we will find a way.

In the meantime, though, I think we will be perfectly content to subsist on pâté.


Pâté de Campagne

adapted from Charcuterie: The Craft of Salting, Smoking, and Curing, by Michael Rhulman and Brian Polcyn

You will need a meat grinder to make this recipe. Having just acquired a KitchenAid from my godmother, we used the meat grinder attachment on that, but you could use any sort, so long as it has large die and small die blades.

Once you've found a meat grinder, the best way to tackle this recipe, I think, is in two phases. In the early afternoon maybe, do all of the prep work—chop the onions and the parsley and the mushrooms and mince the garlic and mix the spices so they're ready to go—throw the bowls and the blades in the freezer, make sure the pork butt and the liver are ready to rock, and get your pots and pans out. Then, take a walk or read a book or lounge around in the tub for a few hours, and while you're getting ready to make dinner, do the meat grinding and the mixing and the baking. That way it doesn't seem like such a daunting task.

Then of course, after the
pâté has cooled for a day or two, get it out along with a baguette and a jar of pickles and squeal with delight.

2 pounds pork butt, cut into long thin strips
4 ounces pork liver
1/4 cup onion, chopped
1/2 cup flat-leaf parsley, coarsely chopped
1 and 1/2 tablespoons minced garlic
2 tablespoons Kosher salt
1 teaspoon black pepper
1/2 teaspoon
pâté spice, made by mixing: (1 teaspoon ground cloves, 1 teaspoon ground nutmeg, 1 teaspoon ground ginger, 1 teaspoon ground coriander, 2 teaspoons ground cinnamon, 1 tablespoon ground white pepper)
2 tablespoons all-purpose flour
2 eggs
2 tablespoons brandy
1/2 cup heavy cream
1 cup sauteed mushrooms (I used shiitakes sauteed in butter), diced

Put two nesting metal mixing bowls, one medium size mixing bowl, and either a KitchenAid bowl or another large mixing bowl in the freezer along with the meat grinder's blades. (Don't skip this step, as the cold will help the
pâté bind together.)

Once everything is frozen, preheat the oven to 300 degrees F. Fill the larger of the nesting mixing bowls with several trays of ice cubes and nestle the smaller one on top. Grind the pork butt through the large die of the meat grinder into the smaller bowl.

Put about a third of this ground pork butt into the medium size mixing bowl. Add the liver, onion, parsley, garlic, salt, pepper, and
pâté spice and mix. Fit the grinder with the small die blade and grind this mixture into the remaining coarsely ground pork. Put the bowl of meat into the refrigerator.

In a small (room temperature) mixing bowl, whisk together the flour, eggs, brandy, and cream. (This is called a "panade.") Take the ground meat out of the refrigerator and mix this into it for about a minute, until everything is combined and sticky. Fold in the mushrooms.

Line a terrine mold (or, if you don't have one, a loaf pan, which works just as well) with plastic wrap, leaving enough of an over hang on the two long sides to fold over the top. Fill the pan with the
pâté mixture and press it down firmly to make sure it doesn't have any air bubbles. Fold the extra plastic over the top and cover the pan tightly with foil.

Place the
pâté pan in a slightly bigger casserole dish, and fill the dish with very hot tap water until the liquid reaches halfway up the sides of the pan. Bake the pâté for roughly an hour, probably a little bit longer, until the inside of the pâté is 150 degrees F. Take the pan out of the water bath and put something heavy, like a tin of olive oil or a brick or a few pounds of butter, on top of the pâté while it cools. Once it's room temperature, put it in the refrigerator and leave it to chill for at least twelve hours, and preferably several days, before serving.

P.S. I wanted to try something new today, which I am going to try to do from now on, which is to tell you where (most) of the ingredients I mentioned in the post are from. It's sort of hard to list this on the sidebar I've realized, since where I find things changes all the time, so even though I might not remember all the time, for today here goes:

arugula, baguette, eggs, onions, pears, & radishes:
the last Provincetown farmers' market, which was, very sadly, on Saturday
afternoon
garlic:
from a winter braid we bought in Maine at the Common Ground Fair
heavy cream:
Garelick Farms, because we haven't gotten a milk coop pick-up yet since we came home
parsley:
Crow Farm in Sandwich, which is open until Christmas

pork:
from our friends in Truro, George and Janet, who very kindly raised us half a pig
shiitakes:
from Julie Winslow in Orleans, last summer, and then we dried them

9.28.2009

His name is Stevie

Friends, I am pleased to announce that we have a brand new addition to our family. [No, this is not going to be a shotgun wedding.] He's a cat, and his name is Stevie.


Alex and I met Stevie on the road, in the dark, on the way home from a dinner party last Saturday night. It was absolutely beautiful out, one of those September stunners of a night, and we had decided to walk the mile and a half through the woods to the house on Old Chequesset. In the pitch black coming back, we heard a meow behind us, and then another at our feet, and before we knew it, an orange cat was marching steadily toward home. We tried to send him back, or away, or wherever it was he might have come from, but he was Not Going to Budge. When we arrived at the door he weaseled his way inside, and then onto the bed, and although a certain Mr. Fisher looked none too certain, it became very clear very quickly that he was going to stay.

We called the animal officer and got him scanned for a micro-chip, and they said he was up for grabs. Today, I took him to the vet, and we officially rolled out the welcome mat. Or at least, most of us did. Some of us still aren't quite so sure.


At any rate, we are finding out very quickly what Stevie Does and Does Not like. So far, we know for certain that he is very amenable to teaspoons of dulce de leche and small bits of ham. Sunday morning we baked a fresh ham for brunch—slathered it in brown sugar and cloves and dry mustard and salt and pepper—and Stevie looked as though he had just landed on a soft, billowing cloud of pure, straight-from-God bliss. In fact, the hope of ham just might be why he decided to follow us home.

This morning, when I collected the leftover bone and scraped off fat and cracklings of skin to make black bean soup, I thought he might just dive right in. I don't blame him, of course—if I weighed 11 pounds, I'd go swimming in my ham and black bean soup, too.

I adapted this particular batch from a recipe I found in the Joy of Cooking with the very intriguing title U.S. Senate Bean Soup. According to the header, a white bean and ham hock soup has been served in the U.S. Senate restaurant since 1901. At first, I wasn't quite sure if that was a good sign or not—the words Senate restaurant sound sort of like code for cafeteria to me—but as it turns out, our elected officials have excellent taste. U.S. Senate Bean Soup is like a hijacked split pea soup, with whole white beans replacing the soupy green mash. I went ahead and took things one step further by throwing black beans in instead.

The resulting soup was just the sort of thing I would imagine a senator eating for lunch. It's nothing hoity toity—nothing high-powered or white linened or too sit-down—but the sort of thing I picture John Kerry sitting down with in a paper bowl and a plastic spoon and reading the newspaper alongside over lunch. It is simple, delicious, and solid—very much a by the people, for the people sort of soup. It's just the thing, come to think of it, that you might make to take over to a friend who just had a baby, or lost an aunt, or maybe got a new cat.

Around here, it has proved an excellent way to welcome Stevie home.

BLACK BEAN AND HAM HOCK SOUP

I made this soup with a bone from a fresh ham that had been baked for several hours. Fresh ham isn't as salty as cured ham, so be careful with the seasoning and taste as you go depending on what sort of meat you use.

1 and 1/4 cups dried black beans, soaked overnight
7 cups cold water
1 small ham hock
1 large onion, diced
3 medium celery stalks with their leaves on, chopped
1 large potato, peeled and diced
2 cloves garlic, minced
1 and 1/2 teaspoons salt
1/2 teaspoon ground black pepper

Place the beans, water, and ham hock in a large soup pot. Bring everything to a boil, reduce the heat, and simmer until the beans are tender (roughly an hour and a half). When the beans are soft, remove the ham hock. Discard the skin and any extra fat and the bone (read: give them to your dog or cat) and return the meat to the pot.

Add the remaining ingredients to the pot as well, and simmer for about a half an hour, or until the potatoes are soft. Turn off the heat and mash the soup with a potato masher until the potatoes form a thick broth. (Some of the beans will be mashed, too, but most should stay in tact.) Serve warm, with chopped fresh parsley and a dollop of sour cream.

9.16.2009

The Local Food Report: the meat mobile

This cow belongs to our friends, George and Janet. He doesn't have a name, because one day, he will be dinner. Or rather, dinners. There's a lot of meat on those bones.


And that meat is grass-fed. (With a few dropped apples and extra heads of lettuce and stolen hay mixed in, to be sure.) But mostly grass-fed. Which means that Mr. Moo, for lack of a better name, will have to be cooked differently than your average cow. The meat most of us are used to—conventional beef, fed grain and raised in feed lots—cooks differently than grass-fed cuts. Mostly, what you need to know about cooking the sort of meat that would come from Mr. Moo is as follows:

1. You will need to get a meat thermometer, and learn how to use it.

2. You will need to turn down the heat.

3. You will need to learn a little bit more about dry-heat cooking methods and moist-heat cooking methods, to the point where you can decide which to use, when.

4. You won't need to use so many seasonings and sauces. A cut of grass-fed beef can stand up on its own.

All of this is important not because George and Janet have decided they are very generous and would like to give you some of their very own homegrown beef, although I'm sure they would if they knew you, but because we have a new meat vendor in town. Or in Cape, or however you want to say it.

Local, grass-fed meat can be hard to find on a consistent basis. There's Ocean Song Farm, which sells pastured chickens and turkeys and pork and sometimes lamb, and Border Bay Junction Farm, which offers up whole lambs from time to time, and deli cases in places like Far Land Provisions in Provincetown and How on Earth in Mattapoisett that sell cuts from Northeast Family Farms. But beef—chuck and Porterhouse steak and ground hamburger and bristket—good, grass-fed beef can be hard to find. Enter Joe Beaulieu, and his meat-mobile.

All summer, Joe has been showing up at the Sandwich Farmers' Market on Tuesday mornings from 9am to 1pm with every cut of pastured beef you can rattle off. He used to sell whole animals, sides and halves and that sort of thing, straight from his farm, but when the economy tanked off, the number of consumers willing to fork over $900 at a time for beef took rather a sharp downward turn. So he built himself an 8' by 8' by 20' wagon—picture an ice cream truck, or maybe a hot dog stand at the beach—threw in two freezers, a generator to power them, and an old Hobart scale, and turned his business plan around. He's gone mobile, so to speak.

And so far, so good. He raises roughly 20 head of cattle a year, has them processed at a USDA approved plant up in Sanford, Maine, and sells every cut imaginable at the market. (Twenty cows, according to Beaulieu, is roughly equivalent to 16,000 pounds, if you can imagine.) He also sells in Braintree, Bridgewater, and Fairhaven, which is where his farm is. He has 27 acres right off 195, where his cows live naturally, like happy cows, as he says. Business at the meat mobile has been excellent, and he says that everyone has come back for more—a lot of repeat customers—which he takes as a sign that he can go ahead and join in the happiness.

He's so encouraged, in fact, that he'll be taking winter orders even after the market shuts down and showing up at the Gallery Gourmet on 6A in Sandwich the second Saturday of every month, from noon to one, for pick-ups.

Just in case you're lucky enough to end up with a freezer as full as his—a cold cavern choc-a-bloc full of roasts and sirloins and hamburger with a good, creaky hinge—here's a recipe for inside-out cheeseburgers. There are also some cooking tips, but for more—because after all, a burger is not a roast is not a sirloin—check out the links all the way at the bottom. The first goes to a very interesting article in the Atlantic published back when the whole grass-fed idea was brand new (or rather, recycled new), and the second goes to the website of the woman who wrote the book the burger recipe is adapted from. It's all about how to cook with grass-fed beef, and it is, in the face of a meat mobile, necessary and excellent.

So enjoy, eat up, and I'll see you all soon.

BLUE STUFFED BURGERS

This recipe is one I adapted from The Grassfed Gourmet by Shannon Hayes a cookbook devoted entirely to how to cook with grass-fed meats. It was given to us as an engagement present and has proved an incredibly handy tool when trying to eat locally. The original recipe called for feta, but I am a firm believer in the merits of Great Hill blue cheese, so I swapped that in instead.

1/3 cup crumbled blue cheese
1 heaping tablespoon fresh oregano, minced
1/4 cup fresh spinach, finely chopped
1 pound grass-fed ground beef
salt and freshly ground black pepper

Mix the cheese, oregano, and spinach together in a small bowl. Divide the meat into four portions and make three patties, setting the extra portion aside. Place a third of the cheese and herb mixture into the center of each patty, pack a third of the extra meat on top of each, and reform the patties so that none of the stuffing is exposed. Sprinkle with salt and pepper, and cook using to the following tips.

1. Form the patty so that it is 3/4-inch thick on the edges and 1/2-inch thick in the center. (Yes, even with the stuffing inside). This will help the burgers cook evenly, and not puff up and become round.

2. Be sure that your pan is hot and that you coat it with a little bit of oil. This will help ensure that the meat doesn't stick and get left in the pan.

3. Pan fry the burger over medium-high heat for roughly 3 minutes a side and you will get a nice, crusty exterior and a juicy interior.

4. Don't press on them with a spatula as you cook, or you will squeeze out their juices.


To find out more about the health benefits of eating pastured meats, head on over here. And for more on cooking with grass-fed meats, check this out.

2.19.2009

The Local Food Report: Red Russian Kale

Kale, you are one tough cookie. February, the coldest month, and you're still going strong. Even under a blanket of snow?


You have some serious hutspa, that's for sure. From what I've gathered, it's a build up of sugar that makes you so strong. You use the sugar to push water from inside your cells into the extracellular zone, where it can freeze without doing you any harm. Now who came up with that?

Whoever it was, I think we both owe them a tremendous thank-you. You survive the winter, and we have charming winter greens. Hurrah!

The funny thing is, the person I met you through planted you by mistake. She meant to plant Eastham turnips, but picked your seeds up instead. I'm guessing you knew that all along, but chose not to say anything. I understand.


But the long and the short of it is, you turned out to be a wonderful mistake. Not necessarily financially, as you require quite a bit more work, but for those of us who simply can't take another day of root vegetables. In that department, you've been a miracle worker. Especially for the shoppers at Orleans' Phoenix Fruits. You get dropped off there most weeks—when the snow has melted for a moment or two, allowing your planter to pick—in a big, red, bushy case. She thaws you out in a bowl of warm water, lets you regain your strength, pats you dry, and you're off. You're Red Russian kale, after all, not just some everyday face. You could run out any day, any storm now, but that's okay. You're doing everything you can to see us through.


I like you especially in soups. The other day your planter left you for me in a cooler by her field, and I conjured up a big, burly pot of Portuguese kale soup: sausage and Maine kidney beans, stored potatoes, onions, and garlic, a bit of beef broth, and crushed tomatoes I'd put up towards the end of summer. It is one of my very favorite soups. You cooked down to the perfect consistency—hardly limp and lifeless like spinach—but instead soldiering on, limber and proud.

I can't thank you enough.

PORTUGUESE KALE SOUP

adapted from a recipe that Mac's Seafood serves at their clam shack on the Wellfleet Town Pier

1/2 to 1 pound (depending on which of these you choose, and how "meaty" you want the soup to be) sausage, chorizo, or linguica, in bite-sized bits
1 medium-sized white onion, finely chopped
2 cloves garlic, minced
2 cups red kidney beans, soaked overnight, or until soft (simmer in water before adding to soup, if needed)
3 medium-sized potatoes, diced
1 quart crushed tomatoes
1 quart beef broth
1 large bunch kale (I used Red Russian, but whatever you can find locally will work)
salt and pepper to taste

Sauté whatever meat you choose in a large, heavy-bottomed soup pot over medium-high heat. When it has rendered a good amount of fat, add onions and garlic, and sauté until translucent. Next add potatoes, sauté for several minutes more, and then kidney beans. Keep stirring and season with salt and pepper to taste (but remember you will be adding beef broth, which adds salt).

Deglaze the pan with about a cup of the beef broth, let it reduce by about half, and add the rest along with the crushed tomatoes. Depending on how juicy your crushed tomatoes are, you may need to add a bit of water at this point. Bring soup to a boil and simmer, uncovered, for about 15 to 20 minutes. Throw in the kale and taste again for salt and pepper, adding seasoning as needed. Continue stirring from time to time, and cook until liquid has reduced by about 1/3 to 1/2 and has formed a nice, slightly thick broth.

Serve hot. This soup is especially good peasant style, with a chunk of hard white cheese and a hunk of county sourdough.

2.05.2009

The Local Food Report: rosemary fried lamb

It is very rare for me to encounter a meat dish that I think is literally finger-licking-good. Pastries, yes. Chocolates, daily. Cheeses and cookie dough go without saying. But meat, I hate to confess, really isn't my thing. It sounds very un-American, I know.


It's not that I don't enjoy a good bowl of wings while feigning interest in the Superbowl, or Gorgonzola Burger Night at work. I do. (Although even then, if we get right down to it, in both cases, it's really the hunky, melting cheese I adore.) But meat is so heavy, and such an endeavor, that is has to be just right for me to bother getting into it.

All this is simply a very long, round about way of saying that this recipe for fried lamb chops is good. Finger-licking-good, in fact. The only trouble with this it is that, if you want to make it with local grass-fed meat, well, you have to buy the whole lamb. And that, in turn, requires making the link between animal and plate.


If that sounds like an unhappy process, hear me out. I mean, don't you think this is a good-looking sheep? A bit skiddish, and camera shy, to be sure, but the type that would produce a very nice, respectable young lamb. The kind that is very good to eat. He's Icelandic, to be specific, one of those old world varieties known for his burly stance come cold weather and especially his beautiful wool. Not to mention his superbly juicy meat.

He belongs to Patrick Roll up in Pembroke—at West Elms Farm—where he lives along with a bunch of rabbits (yes, also to eat), and a llama, and a goat. Although you feel a bit out of place as you drive up—it's a bit of a farm in suburbia scenario—once you realize what Roll is doing and how the lambs eat, it's very cool. On only four acres, he's raising grass-fed lamb. Four acres! Just imagine that.

The way he does it is by rotating the sheep. They get a few days here, a few days there, and then are hustled along by the threat of the electric fence. (Roll says the lambs are actually very smart, but always bump into the fence the first day. Needless to say, it never happens again.) This is actually good for the grass, because it allows for constant trimming without total destruction, which in turn strengthens the roots and prevents the tops from going to seed. Plus, the lambs are forced to eat everything on their plate, even the less tasty things (weeds always go first), which means more food, on less land, and so more fat, healthy lamb to eat.

If it sounds complicated, it's not. The most important thing, in fact, is simply that you know when you buy local, grass fed meat that you are eating a happy, healthy animal, and hopefully end up feeling the same way. I know for me, it's one of those warm, fuzzy moments inside.

Especially when it is lamb chops I am eating, and they are battered and fried. This recipe is not only good, but it's easy, and though it will use up nearly a year's supply of olive oil, at least the other ingredients are fairly routine. All you need is flour, and baking powder, and club soda for the batter, and a bit of salt and pepper to give the meat a rub down. Then you grab a few sprigs of rosemary, presuming you still have some surviving in a sunny corner or maybe even (!) outside, and fry those, too. All this should explain why it's a good idea either to be predisposed to finger-licking-good meat, or to have a napkin handy nearby.

So without taking up any more of your time, I'll leave you to it. Enjoy—

ROSEMARY FRIED LAMB CHOPS

adapted from Olives & Oranges by Sarah Jenkins and Mindy Fox

1 cup flour
1/2 teaspoon baking powder
1 and 1/2 cups club soda
olive oil (about 3 cups)
salt and pepper
8 small lamb chops (From the ribs, not the loin. In other words, a whole rack.)
4 sprigs rosemary

In a medium sized mixing bowl, whisk together flour, baking powder, and club soda. Pour olive oil into a large, deep skillet and heat over medium flame. Rub chops with salt and pepper, and let sit for several minutes. When oil is hot, dip chops one at a time in batter and carefully toss into oil to fry. Fry as many as you can fit in the pan at one time, for about 2 or 3 minutes per side. Remove with tongs and let dry on a paper towel to soak up the fat. When all chops are fried, throw in the rosemary, turning it quickly, until it becomes a little bit crackly. Place lamb chops on a serving plate and crumble fried rosemary over top. Serve with a garlic aioli dipping sauce if you'd like, or with a drizzle of lemon.

For more information on managed intensive grazing, the rotational grazing described above, go here or here. If you want to know why we care whether or not cows and sheep eat grass in the first place, I highly recommend checking out this book. Turns out it's more important than we think.

2.03.2009

Brilliant like that

When you have a great deal of leftovers piled up in the fridge, the time has come to make a lasagna. Lasagna is brilliant like that, because it can be made out of most things, so long as a bit of cheese and tomato sauce jump in. The only trouble is when you don't even have lasagna noodles on hand.

Then it is a good night for baked spaghetti.

Baked spaghetti is not an elegant dish. It does not cry out to be photographed or served on a white porcelain dish. It is made for eating late at night, after a hockey game or perhaps a trip to the gym, sitting on the couch with a glass of red wine. It is especially good on nights when your hot water heater is broken, and though you could have chosen to shower at the gym you decided to come home and take a nice, long, luxurious bath. It is very helpful on an occasion like that.

Also, if you want to dress it up, it is something you could make from scratch. But then, you would probably opt for wide, lanky lasagna noodles if you did that. They're much, much simpler to make. And they make much less of a mess.


Last night, I am sorry to say I did not have the wherewith all to accomplish anything like that. What I did have, I am happy to report, was a pint of leftover tomato sauce (which, in turn, was made from a jar of crushed tomatoes I'd put up and a heap of leftover meatloaf from last week, though I'm not sure that's something I should admit) and a full tub of ricotta cheese from Narragansett Creamery, which just so happens to be some of the best stuff on earth.

Now you might think that's an exaggeration, but really, it's not. Not at all. In fact, it won some sort of World Cheese Championship, so a few other people think so too. It's also made in Rhode Island, where I picked it up along with some delicious soft, moldy white cheese and a bit of salty feta at the Providence winter market the other day. If you buy it online, you can get a whole sampler, which I highly recommend.

But the point is, when you have The World's Best Ricotta in your fridge, boiled spaghetti might seem like sort of a lame way to use it. Normally, I would agree, but when there is no warm tub to be had, throwing your ricotta into a pan of baked spaghetti is sometimes the only way out. And naturally once you try it, the ricotta is so good that you really don't regret the decision at all. (Until the next day, when you spot the jar of sun dried tomatoes in your fridge, and you reach for a loaf of bread and the ricotta, and poof! it's gone.) In fact, the baked spaghetti goes down so smooth and disappears so quickly, that you really don't have time to regret anything at all. Not even the fact that you still haven't showered.

And the next day things are even better, because when you awake in a hurry to get back to the gym for hot water, you have already made your lunch and the last bits of baked spaghetti and Award Winning Ricotta are already packed up for the office just like this:


And even though the weather is stuck in some sort of strange limbo between rain and snow, you know it is going to be a very good day.

BAKED SPAGHETTI

This is less of a recipe and more of a guideline of sorts, as you can mix and match and throw just about any sort of cheese or tomato sauce in. I recommend using ricotta for the pasta and the layers, and grated cheddar on top, as it forms a thick, chewy sort of skin. So here goes:

to toss:

spaghetti, dry or fresh
grated, crumbled, or spreadable cheese such as mozzarella, feta, or ricotta (tossing cheese)
salt
1 garlic clove, minced
olive oil

on top:

tomato sauce (preferably with meat)
kalamata olives, pitted
grated cheddar or mozzarella cheese

Bring pasta water to a boil; cook spaghetti as your prefer. In a large mixing bowl, combine salt, garlic, olive oil, and a little bit of the "tossing" cheese. Drain pasta and dump immediately into the bowl, tossing with tongs so as to melt cheese and coat the pasta with all the bowl's ingredients.

Preheat oven to 375 degrees F. Grease a Pyrex baking pan (the size will depend on how much pasta, cheese, sauce, etc. you have to work with) and spread half of pasta mixture evenly over the bottom. Layer remaining "tossing" cheese over top, along with kalamata olives and any other goodies you want to throw in. Spread remaining pasta mixture over this layer, then pour tomato sauce over top of everything.

If the tomato sauce you are using is meaty and dry, it's a good idea to pour a bit of tomato juice or chicken broth over the whole thing at this point, so it won't dry out as it bakes. Sprinkle grated cheese over top and bake 15 to 2o minutes, or until the top is bubbly and golden brown.

1.23.2009

A time and a place

I tried awfully hard to make this look dainty for you. I'm sorry. I really did. But even if you cook meatloaf in a bundt pan, it doesn't come out ladylike. It's lewd and burly, all the same.


I've decided that's okay. There is a time and a place for meatloaf, and afternoon tea just isn't it. It belongs in a logging camp, or maybe at an old-fashioned boarding house, or slapped between two pieces of bread for a real man's sandwich. Or the way we had it: on a Sunday evening with coleslaw and beers, and no pretense of fuss.

This particular meatloaf came from a woman I very much respect, Annie B. Copps, at Yankee, so I suppose there's no reason to worry over presentation too much. (Though I noticed she did not include a photo in the magazine.) She got it from her mom, who considered it a bit déclassé, and but later confessed to liking it quite a bit. As a child, Annie says she often begged for it, and after making it, I understand perfectly why.

It's knock-your-socks off good. It's soft, salty, meaty, and rich—despite the fat drippings that are lost over top of the pan. I can't exactly endorse it as healthy, but that's what Sunday afternoons are for, right? It's a relaxing, belly-aching kind of meal, just the kind you want this time of year. Maybe on the occasion of a football game (even if you pay no attention to the the men in tights), or after a long day outside chasing your dog hopelessly through the sinking dunes.


You start with bread and broth, and then add meat, onions, and eggs. Then you simply season, mold, and bake. It's very simple, really. It's much easier to make, in fact, than say, a real bundt cake, and it's also much less time consuming to bake than it is to find a crowd to devour the thing. It's good, heavenly—but there's only so much meatloaf two people can eat. Even if we each ate a slice every day for a week, I'm entirely certain we could not polish it off. So keep in mind that this recipe requires friends, and keep a phone handy while you bake.

ANNIE'S MEATLOAF

adapted from Yankee magazine, January/February 2009

3 slices white bread
1 cup beef broth
1 pound ground beef
1/2 pound bacon or salt pork, very very finely chopped*
1/2 pound chorizo, very very finely chopped*
1 cup onion, finely chopped
4 cloves garlic, minced
3 eggs, lightly beaten
1 tablespoon dried rosemary
1 tablespoon dried thyme
1 teaspoon nutmeg
1/2 cup ketchup
1/8 cup mayo
1/8 cup mustard, whole grain
4 bacon strips, uncooked

Preheat the oven to 350 degrees F. Put the bread in a small bowl, and pour the broth over it. Let is soak up as much liquid as it can. In a large bowl, knead together the meats. Add bread and broth, onion, garlic, eggs, herbs, and condiments. DO NOT add any salt: the broth, meats, and condiments are plenty salty enough. Salt would be a big, big mistake. Knead by hand (clean hand!) until well mixed. Grease a bundt cake or bread pan, and pack meat mixture in. Arrange bacon strips on top, and bake about an hour. Let rest 20 minutes before serving. Leftovers make excellent sandwiches, particularly with a dollop of coleslaw for a really dirty meal.

*I used a food processor for this, which worked very nicely.

1.21.2009

Onion soup without tears

When there is a new president, it is important to host a luncheon.

Even if it's only you, and your fiancé, and his cousin and his cousin's girlfriend who can attend. And even if you're cooking frantically, on a break from writing at your office across the street, just as the speech begins. Even if you've broken into his other cousin's kitchen to cook without consent; it doesn't matter the circumstance.


There is a new president, and so there ought to be a new recipe for lunch.

Also, it helps to use a new book. We're starting over, you see. From my Christmas pile, I picked Nigel Slater's latest cookbook to start the new term with. It's a kitchen diary, sort of like this one, except he wrote down everything he cooked, every meal, every day, for a year. The photographs are spectacular, and the text enchanting. The only trouble is, the seasons are a bit adrift. For instance, he starts the year like this:

January 8
The first rhubarb

Clearly, he lives in a much friendlier place. Around here, the first rhubarb appears in oh—say, April, probably May. Fat chance of digging any up today. Luckily, his January 11th entry offered something a little more realistic: namely, French onion soup.

I adore French onion soup. It is the absolute perfect evening winter meal: simple, warm, and just substantial enough to get you through the night. It can be made vegetarian, or carnivorous, and it is salty as the sea. Also, at the same time, it is sweet.

Slater's version is simple. It starts with roasting the onions with butter and salt and pepper in the oven, so that the whole experience is pleasantly tear-free. It then requires you to burn off a little white wine, simmer some vegetable stock, and keep the pot of soup warm while toast and Gruyére melt beneath the broiler. It's so easy that all of this can easily be accomplished, even while you are watching a speech on t.v.

I made a few changes—swapping vegetable stock for beef, and Shy Brother's cheese for Gruyére—but mainly, I stuck with his pot. I feel quite sure we'll be making it again.


ONION SOUP WITHOUT TEARS

adapted from The Kitchen Diaries, by Nigel Slater

5 medium onions
3 tablespoons butter
4 ounces (one glass) white wine
6 cups beef or vegetable stock
a loaf of crusty French-style bread
several ounces good melting cheese

Preheat the oven to 400 degrees F. Peel the onions and cut them in half from tip to root, then lay them in a large, heavy-bottomed pot and add the butter, and salt and pepper to taste. Roast about 30 minutes, or until they are golden and tender. You may want to check on them a few times to see if they need turning.

Put the pot, with the onions, on the stove. Add the wine, and reduce it until the liquid nearly disappears. (As Slater explains, this is because you want the flavor, not the alcohol.) Pour in the stock, bring to a boil, and simmer about 20 minutes.

Just before you're ready to eat, put several slices of French bread beneath the broiler, or in the toaster oven (one slice per bowl of soup). Toast one side, then flip them and toast the other, layering several slices of cheese on top. When the cheese is bubbling and hot, ladle the soup into bowls and rest the cheese toasts on top. Serve immediately, with a spoon and a knife.

1.05.2009

Venison jerky, and a deer

I had a whole post for you yesterday, but it vanished suddenly with a clumsy click.

It was about a walk we took last night, and how we sighted the prints of a big deer. It was about how the shadows on the snow fell all dark and silent and blue—and how surreal it was to realize that such a big animal lived so nearby.

It was also about the hunt—how we imagined we were stalking it for real, what it might actually feel like to track and kill a deer. Of course, I've never even held a bow, but it was fun to pretend. He took us through swamps and briars and open woods, and finally down an old dirt road that led nearly to the back of our house.

We were amazed he had come so near—a friend was just telling us there isn't much to hunt around here. He says he goes instead to upstate New York, where he finds many more bucks. He says it isn't that you can't find a buck here (the progression of bow to shotgun to powder that starts in October and ended last week certainly gives enough time) but that he'd feel badly, taking one of so few. I'm not convinced they're so scarce, but our tracking adventure made me wonder, made me feel their presence at least.


Oh! And I was telling you about the venison jerky—it would be a shame to forget about that. The same friend who shot the bucks in New York gave us a bundle of his venison Slim Jims to taste. They were a bit softer but still chewy, salty, and not gamy in the least. He had a recipe to share, just in case we ever get that deer. And you can make it with ground beef—a tasty, tasty treat.

VENISON JERKY

10 pounds ground venison meat (the same recipe also works for beef)
jerky seasoning to taste (he gets his from Cabela's)
2 cups vermouth
2 cups brown sugar

Combine ground meat, jerky seasoning, vermouth, and brown sugar in a large bowl, making sure to keep everything cool. Pack mixture into a jerky gun or sausage extruder; it will come out in sticks. Bake in a preheated oven at 200 degrees for 4 hours, until the sticks have the consistency of Slim Jims. They will freeze well, or you can let them cool and stick them in the refrigerator to enjoy within a few weeks.

1.01.2009

The Local Food Report: mushroom soup

I have two recipes for you today. Both are from Ruth Reichl, and both are very simple. For those of you who don't know, Reichl is Editor-in-Chief of Gourmet, and former restaurant critic for the New York Times. I had the privilege of speaking with her in November, and the first of two interviews came out on the radio today.

Reichl has claimed in several interviews to be a cook, not a chef, and says that's why she keeps her recipes easy. Regardless of why, they are truly very simple to make. She may not be a chef, but she is a wonderful cook. Happy New Year to all of you, and enjoy.

MUSHROOM SOUP*
from Comfort me with Apples, by Ruth Reichl

Serves 4

1/2 pound mushrooms
1/2 stick (1/4 cup) unsalted butter
1 small onion, diced
4 tablespoons flour
1 cup beef broth
2 cups half-and-half
salt, pepper
1/4 teaspoon nutmeg
1 bay leaf

Thinly slice the mushrooms.

Melt the butter in a heavy sauté pan. When the foam subsides, add the onion and sauté until golden. Add the mushrooms and sauté until brown.

Stir in the flour, and then slowly add the broth, stirring constantly.

Heat the half-and-half in a suacepan or in the microwave. Add it to the mushrooms, along with salt, pepper, nutmeg, and bay leaf. Cook over low heat for 10 minutes; do not boil.

Remove the bay leaf and serve.

*I used dried black trumpets from Oyster Creek Mushroom Co. in Maine, pictured above, which I rehydrated for use in the soup.

ROAST CHICKEN
from Garlic and Sapphires, by Ruth Reichl

Serves 4

1 farm raised chicken, about 3 and 1/2 pounds
1 lemon
Olive oil
3 or 4 smallish Yukon potatoes (or any other variety except russet), each peeled and cut into 8 pieces
1 large onion, cut into 6 pieces
3 or 4 cloves garlic, unpeeled
salt and pepper

Preheat the oven to 400 degrees F.

Wash the chicken under running water and pat it dry. Remove and reserve the extra fat from the inside of the chicken. Very gently run your fingers between the breast and the skin, beginning from the neck end, loosening the skin from the breast on both sides. Being careful not to puncture the skin, place the excess fat beneath the skin (the chicken will then baste itself).

Puncture the lemon a few times with a fork, and place it inside the chicken.

Pour enough olive oil into a roasting pan to make a thin film over the bottom. Toss the potatoes, onion, and garlic into the pan and turn until they are covered with olive oil.

If you have a rack, put the chicken on it, breast side up, and place it in the roasting pan (you may have to jiggle things a little to fit it over the potatoes and onions). If you don't, just put the chicken right into the pan. Pour a little olive oil over the chicken, and salt and pepper everything in the pan.

Roast for about 1 hour, or until an instant-read thermometer inserted into a thigh reads 170 degrees F. Remove the pan from the oven and let the chicken rest for 10 minutes.

Carve the chicken into serving pieces, surround them with the potatoes, onions, and garlic, and squeeze the lemon over the top.

12.22.2008

Turkey carcass soup

It's bone chilling out there today. Even with the woodstove roaring, the wind is finding its way in under doors. It's skirting through window panes, howling around the eves, and blowing up leaves from the snow.


It's a soup day, in short. Last night's turkey carcass sits nearly devoured on the stove, all bones and skin and bits of untouched meat.

We had an early Christmas feast, to celebrate the arrival of a west coast friend. No matter that she didn't arrive, snowed in still in Seattle, skidding back and forth across the city in taxi after taxi to and from the airport. We missed her terribly, of course, but the turkey was already thawed, the invitations made, and a ten pound Hubbard squash peeled in her honor. There was little left to do but eat.

And my goodness, did we eat. We ate roast potatoes and cranberry sauce, white meat and dark, spinach salad, roasted beets, and goat cheese with bread. There was stuffing with pine nuts and apricots, braised short ribs in a noodle stew, wine and beer and sparkling pomegranate juice to boot. Even when we thought we were through, someone brought out ice cream and a pie, and a bag of cookies, chocolate chip.

Still, though we tried, we didn't quite finish the turkey. We were down in numbers and strength, having counted on the appetite of one more, starved from airport food and the bustle of travel. But it wasn't all bad; there was just enough left over to make my mother's turkey soup.

It isn't really my mother's, I should admit. It's Jane Brody's from her Good Food Book, Turkey Carcass Soup. But my mother's made it so many times, so adopted it as her own, that I've given it over to her in name. It's a hearty soup, perfect for weather like this, even, if need be, excellent warmed over the wood stove.

My mother doesn't quite follow Brody's directions; rather than waste vegetables in the stock, she simply adds the scraps—carrot tops and celery leaves, turnip clippings and onion ends—from what she will sauté later in the soup. She sprinkles it with Parmesan cheese, too, just at the end, for a fuller, richer cup. But overall, the idea's the same, so I'll give you a version that's nearly Brody's, that you can make changes of your own.

TURKEY CARCASS SOUP
adapted from Jane Brody's Good Food Book

Stock:

My mother recommends doing this on the woodstove, if you have it going already. The temperature is perfect, and you avoid using extra gas or electricity.

Combine in a large pot: 1 turkey carcass, broken into pieces; any left over fat or gravy; 12 cups water, or enough to cover carcass; leaves/tops/scraps from onion, celery, carrots, and turnip (my mother sometimes uses rutabaga, which she finds equally good) you will use for the soup, below; 1 clove garlic, minced; 1 teaspoon salt; 6 sprigs fresh parsley; 1 sprig fresh thyme; 1 bay leaf. Bring to a boil, and simmer partially covered, for 2 to 3 hours. Strain, and skim off the fat. Stock can be used immediately or frozen for use in a future soup.

Soup:

In a large saucepan, sauté 2 tablespoons minced onion and 1 clove minced garlic in 1 tablespoon olive oil until soft. Add 1/2 cup carrots, diced; 1/2 cup turnip or rutabaga, diced; and 1/2 cup celery, diced, and cook, stirring, until soft. Add 1 and 1/2 tablespoons flour, and cook while stirring for another minute. Add 6 to 7 cups turkey stock, 1 teaspoon marjoram, salt and pepper to taste, and 1/3 cup raw barley. Bring the soup to a boil, reduce heat, and simmer for about 1 hour. Add 1 cup diced turkey meat, adjust seasonings to taste, and bring the soup back to a boil. Serve hot with a sprinkle of Parmesan cheese.

12.18.2008

The Local Food Report: dry-cured sausage

The white stuff, I've been informed, is good. That's a good thing, because there's certainly a lot of it. I went down to see David Schneller's sausage hanging workshop—in a basement cellar behind Abbicci—before the restaurant closed.

(Word came November 21 that the doors had suddenly closed, apparently because of hard economic times.)

Nevertheless, I have happy memories of my trip underground. There were steep stairs, a sterile room, a hefty fan, and row upon row of penicillin covered meat. That's what the white stuff is—the good mold, white penicillin. It adds flavor, acidifies the meat, and helps ward off less friendly bacteria as well.


The curing season started back in the fall—when temperatures dropped into the 50s and 60s, and humidity began to hover around 75 percent. This is also when worries over flies desist, and when it becomes expensive to keep around a pig or cow, rather than slaughtering it for meat. The days of fresh pasture and outside living are over, and winter weather requires feed and a barn. As Schneller put it, it's the time when preserving the meat as sausage simply starts to make good economic sense.

His sausage recipe is more science than art. It has to be done in a refrigerator, with all the ingredients kept very cold. He relies not on measurements, but weights, and there are no pinches or sprinklings involved.

That's because making sausage can be scary. It's not the type of thing you want to experiment with if you don't have a plan. Preferably, it's best to have someone overseeing you who's done it before, and knows—so to speak—the lay of the land. This is because the meat starts out raw, and never really gets cooked. Instead it ferments, like sourdough bread or beer, and anyone who's experimented with either knows the process is a bit of a trick. It helps to have a teacher along the way.

(Luckily, most people who make sausage say it's easy to spot one gone wrong. It will lack mold, or have air pockets, or develop brown spots, all signs of botched meat.)

With all that in mind, I offer Schneller's recipe—or basic proportions I should say—and recommend that if you're interested in sausage, you find a mentor before you dig in. At the very least, it will save you wasting some expensive local meat.

BASIC SAUSAGE PROPORTIONS

10 lbs. pork butt
2 lbs. fat back
2 oz. curing salt
1/2 oz. sugar
1 oz. salt

To read an article on dry-cured sausage about history and safety from the New York Times, visit this link. 

For more on safety procautions when making sausage, check out this USDA sausage storage & safety chart.

For more info on where to by local meats, check out the "Shop like a local" list to your left.

LinkWithin

Related Posts Plugin for WordPress, Blogger...
All text, photographs, and other original material copyright 2008-2010 by Elspeth Hay unless otherwise noted.